Showing posts with label landscaping projects. Show all posts

August 12, 2017

Before and After Kitchen Remodel and Dining Room Addition

Our down-to-the-studs kitchen remodel and dining room addition were completed after nine months of work (including seven weeks without a kitchen, during which time we hosted family for Christmas!) instead of the promised two and a half months.  And yes, it was over budget as well, but we're happy with the results.  The photo above shows the view of the back of the house with the new dining room addition, patio and patio cover in place.

Here is a photo of the house before construction.

We had to have the old patio demolished and remove part of a flower bed to make space for the new patio.  The kids and I have been spending a lot of time eating, reading, chatting, or just sitting on the new back patio.  We can usually spot butterflies, dragonflies, many types of bees, hummingbirds and many other birds in the garden.  I was excited to add another dogwood tree after the project (middle of photo).  'Starlight' is a Rutgers hybrid and is known for its vigorous growth, columnar shape, and beautiful white flowers in spring.  I also planted a climbing hydrangea (Hydrangea anomala petiolara) by the post at left that will eventually climb up and across the entire front of the patio cover.

The kitchen expanded during the remodel to take over the space where the dining area used to be.  I've been loving the new bar that seats the whole family, as it makes mealtimes much easier.  Unfortunately, in the months since it was finished I am the only member of the family who has demonstrated the ability to clean the mirror-like granite of all streaks.  But the Blue Pearl granite is so pretty that I don't mind too much.

We were blessed to have our neighbor, Nicki, design the layout and cabinets while she was working for Canyon Creek Cabinets.  I am sensitive to offgassing chemicals, and I was relieved that these high quality cabinets did not make me sick.

This is the same view of the old kitchen.  It wasn't bad before, but the new arrangement offers a lot more storage and room for all the growing bodies in this house.

The new dining room has windows on three walls so we can enjoy garden views and air conditioning while dining.

This was the old dining space.  We often host extended family gatherings, and we made it work with folding tables extending into the living room.  Now we can fit fourteen at the new dining table (if we squeeze kids onto benches) plus six more at the bar.  We've already used the table at max capacity and it was a fun meal (come visit with your families anytime, Melissa and Ashley).

Here's the view while standing in the new pocket door opening.  This year my three kids in piano lessons are supposed to practice for two and a quarter hours each day in total, and their teacher says they only need to practice on the days that they eat!  Sometimes it's really, really nice to close the pocket door and reduce the sound level while I'm cooking dinner.  This shows a good view of the Montagna Rustic Bay ceramic tile flooring that looks like wood.

This is nearly the same angle from before construction.  What a relief it is to have finished this big project!  Of course other projects are still in progress . . . we had three floods in the basement this spring and had to replace moldy carpet and drywall, and after switching the trim on the main level from wood to white, we are slowly planning to replace trim on the other levels as well.  Honestly, it would have been less stressful to move to a different home, but the garden wouldn't move well and we love our location.  We're looking forward to enjoying this nice space with our family for many years to come.

November 19, 2016

Remodeling Progress


Our remodeling project is continuing with the new dining room coming together.  It has been two months since work began, but the slow pace hasn't been a problem since the work so far has all been outside.  We're hoping things progress  more quickly once the kitchen is torn apart.

We  were relieved to see a lot of progress this week, as we hope to get the new concrete patio poured before the ground freezes for the winter.  There is a big pile of dirt to move first.


Now we have walls, a roof and a big mess!   My sweet husband has begun putting the path back together.  It's a cold and muddy job.

October 20, 2016

October Leaves and Remodeling


October has been cool and rainy with a steel-blue sky making a lovely backdrop for the colorful leaves.


A couple of weeks ago the garden was still mostly green and full of foliage.  This northwest corner is finally filling in, though next year should be even better after all the transplanting I did this month!  It seems like I've said that every autumn for several years.  I'm excited for the time when I'm done with big bouts of transplanting because this area finally looks right.


Our remodeling project isn't moving very quickly.  The plants on the west side were smashed when the excavator drove through, but it was time to cut them back to the ground anyway so they should recover next spring.


The path had to be partially disassembled so the flagstones didn't get crushed.  Putting it back together isn't going to be very fun.  But the hole was dug, the concrete foundation poured, and my crabapple tree is still standing in its place.  This tree will provide welcome shade on the west side of the addition, though it will need careful pruning to keep it from growing into the walls.  Good thing I know how to prune.


This is the current view of the project from above.  We're looking forward to the arrival of framers and the next steps of construction.

January 19, 2015

Before and After Photos of VW Garden


Who doesn't love before and after photos?  Here are some shots to show the changes we have made to our landscape since we moved into our home nearly eight years ago.  The poor quality photo (sorry, it was all I could find) on the left shows the house when we bought it in late spring 2007, and the one on the right shows it seven years later.


We hired help to complete a large landscaping project in the front yard in February 2010.  The photos above show the project in process (left) and the new 'lawn river' (right) between the expanded flower beds.


I didn't have a good shot of this angle from 2014, so the 'after' photo from 2012 above doesn't show how large the cherry tree is now.  But you can see how the porch and surrounding flower beds were changed during the 2010 project.  Removing the railing, replacing it with a stone-based column, and adding wide steps across the front of the porch helped this side of the home to better balance the large garage.


The front yard used to feel very flat and open, but now maturing trees, shrubs and perennials add layers of height to create interest.  Houses in our neighborhood are built close together, and I think large trees help to make them feel more separate.

These photos aren't exactly the same angle, but on the left you can see how small the flower bed on the west (left) of the house used to be.  During the 2010 project, we took out all of the grass on this side of the house and created a flagstone path with planting areas on either side.  Now instead of walking past the garden on the way to the backyard, you walk through it.  Stone facing, shutters on the window and trellises also enhanced the area.
 
In April 2013 we completed a large landscaping project in our backyard.  I drew the plans, but we hired a landscaping company to carry them out.  The landscapers used large equipment to remove the lawn all around the edges of the backyard, install a barrier to hold back the neighbor's invasive aspen tree roots, and create a flagstone path that circled the yard with spurs running down the east and west sides of the home.  I hesitate to show "After" photos of the backyard because it doesn't feel mature yet, but I'll do it anyway and then update them in a few years.
 
Back in 2008 my husband (with 'help' from our son) cut out little circles of lawn to plant trees in the backyard.  Those trees, six lilac shrubs and the center of the lawn were the only plants left in place during the 2013 project.  By 2014, the trees had grown quite a bit and the southwest corner of the backyard (just inside the gate) included shrubs, perennials, flagstone path, and not a bit of lawn. 
 
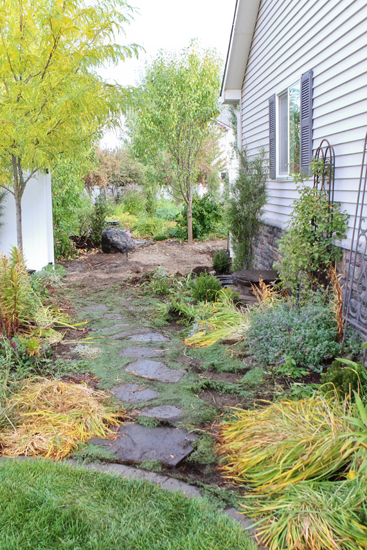
The photo at left shows the west side of the backyard in late 2008, including the baby trees we planted earlier that year.  The photo at right is from a different angle but shows how the west of the backyard was full of large trees, shrubs and perennials by 2014.   The landscapers did the biggest projects in 2013, but after they finished my husband hauled 20 cubic yards of soil and 15 cubic yards of bark to the backyard.  Then he planted or transplanted over 100 shrubs for me, using a pick axe for most of the holes since our native soil is so rocky. 
 
The northwest corner of the backyard was empty of anything except lawn originally, but by early 2013 we ("we" as in I directed and my husband dug) had cut out a flower bed around the trees as you see above left.  During the 2013 project the flagstone path was installed in front of the old mound and we created a new mounded bed on the other side of the path.  This area has been the hardest one for me to design, and I'm still waiting to see if it comes together as it matures or if it needs more refining.
 
I didn't have a photo of the barren northeast corner of the backyard from right after we moved in, and by early 2013 we had created a veggie garden around the tree in the corner as you see above at left.  As part of the backyard makeover, we installed a higher quality swing set, which you can see at right. 
 
This last set of photos shows the changes to the southeast corner of the backyard, which was as empty as the rest of the backyard in 2007.  By 2010 my husband had planted trees along the fence and dug out flower beds around them, and I had planted many shrubs and perennials.  The 2013 project removed the rest of the lawn and replaced it with flagstones, and we have planted quite a few more plants since then. 
Even as I wish for the gardens to be more mature, these photos remind me that we have accomplished a lot in eight years . . . in addition to going from two kids to four and keeping up with the rest of life. Capturing photographs for this blog has helped me to see the beauty along the way, and being able to share that beauty with others has been a joy.  Thanks for visiting.

May 26, 2014

Not Quite Billowing and Encompassing, But On Its Way


It is amazing how quickly the gardens change this time of year.  In just a few weeks the perennials have made a lot of growth and the trees and shrubs have finished leafing out.  So I am posting more wide views of the garden to show the progress.
 

I am starting with a couple of shots from the west garden, which was planted in 2010 and is more established than the backyard, which was mostly completed last year in 2013.  The clumps of gold and violet iris are finally really big and pretty.  Violet 'May Night' salvia (everyone should grow this plant) is just starting to bloom, while 'Walker's Low' catmint sprawls everywhere.  The catmint should not be fertilized, but it's growing next to my roses so its roots soak up some of the fertilizer meant for the roses and then get floppy.  Oh well.


This area just inside the gate is meant to be a sort of foyer.  When the trees mature enough to create a ceiling and the shrubs grow large enough to feel like walls, there will be a comfortable sense of enclosure with hints of the view beyond to draw you into the garden.  Now that the big elements are in place, I have plans to divide and transplant perennials along the edge of the path to add more color.  My goal is for the mature garden to be billowing and full, just on the edge of overgrown, so you feel surrounded instead of just looking down at it.


Looking north from the gate, the maroon leaves of 'Royal Raindrops' crabapples contrast with all the green. They grow quickly, so it shouldn't take too much longer before the branches grow into each other to make one large canopy.  I really like these trees, and the two weeks that they bloom each year are spectacular, but they do have some drawbacks.  They require a lot of pruning because the branches keep growing too low and I have to remind them that they're trees, not shrubs.  The other drawback to this tree is the thousands of tiny seedlings that are coming up from the thousands of cute little crabapples that are produced each fall.  Even Preen hasn't stopped the problem.


This is the current unimpressive view of the main garden bed.  I have been sitting in that chair in back while pondering on what else this focal area needs.  There are plenty of perennials and shrubs for color later in the season, but I need more interest during April and May.  Deep rose 'Don Quichotte' and purple 'Negrita' tulips bloom in April and are known to be reliable perennials, especially in a raised bed like this one.  'Renown' tulips are similar in color to 'Don Quichotte' but bloom in May and are also good perennials (not all tulips come back each year).  'Globemaster' and 'Purple Caila' alliums bloom in late May, while 'Ambassador' alliums bloom in June.  Such a large area needs a lot of bulbs to fill the space, so I have a huge bulb order coming this fall from Van Engelen and Zonneveld.  I'm not looking forward to all the planting, but at least it's very easy to dig in this imported soil.


The key to getting better photos of a young landscape is to squat, so you get less of the bare soil in the view.  I have enough shrubs and perennials planted that in a few years the gardens will be very full, but it just takes time.  Here is another shot looking toward the northwest corner, taken while scuttling about like a crab.  Of course I have to point out the darling ruffled leaves of the 'Victoria' rhubarb in the back. 


 The 'Hall's Purple' honeysuckle is slowly making progress up the sides of the swing set and should eventually cover the whole thing.  I have been using large black zip ties to hold the stems to the metal.  When the trees mature to form a ceiling, the chartreuse 'Sutherland Gold' elderberries on either side of the swings grow to 9' tall and a little less wide (thanks to pruning if needed), and the 'Shasta' doublefile viburnum in the far corner reaches 6' tall and 8-10' wide, the bench will feel nestled into the garden instead of sitting out in the open.


Hopefully the same thing will happen around this bench as the dogwood tree behind it matures along with the surrounding shrubs and perennials.  This bench faces the main garden bed, so next year it will be a perfect place to sit and enjoy the hundreds of tulips and alliums I'm going to plant this fall.


Why are the sides of the house so much prettier right now than the main focal points of the garden?  Well, the west side is just more mature, and this east side has so many perennials packed into it that it already feels full.  As a gardener friend pointed out with a chuckle, I'll soon have plenty of divisions to share.  If you are in Spokane next spring and want to come get a few, just let me know!

January 15, 2014

Buttermilk Moss Milkshake


A few months ago I woke up in the middle of the night in a cold sweat with the awful realization that the creeping mint (Mentha requienii) I had planted around my flagstone path was going to take over the entire garden.  My husband got a good laugh when I told him the next morning.  No monsters under the bed in my nightmares, just runaway mint.  Scaaaaary.  Anyway, the original section of mint I planted a couple of years ago reseeded up to several feet away and kept coming back even though I had dug it out.  I paid my kids to dig up all the little clumps of mint from the backyard path so we could try something else.  It was a good thing I thought of this just a couple of months after planting the mint, so it hadn't established itself very well yet and was easy to remove.  I had heard of blending moss with buttermilk in the blender to spread it (see an example here), so I decided to try it.  Above is the moss buttermilkshake in process.


Several friends were generous enough to let me dig moss from their yards to use in my project.  Because I had such a large area to spread with moss, I mixed one part water with one part buttermilk and threw several clumps of moss into each batch.  The buttermilk is acidic and creates a good environment for the moss to start growing.  After blending for a few seconds, the mixture looked like this.  Yummy.  My blender didn't seem to have any damage afterward, even though I didn't get all of the bark, dirt and rocks out of the moss clumps before blending them. 


I read that blending up the moss stimulates it to start growing, as long as it gets regular moisture after being spread.  I made many batches and dribbled them all around the flagstones in the backyard path.  After a few weeks, the moss began to grow as you see above.  It was good that I tried this in the fall, when temperatures were cooler so it was easier to keep the area moist.  I kept the sprinklers watering regularly even after the first light frosts.


The moss has continued to grow whenever it warms up above freezing.  Many areas of my flagstone path get too much sun to keep moss happy in the summer.  I'm thinking of digging out the moss from the cracks in the sidewalk in front of our house to spread in the sunniest areas, since that type of moss grows in full sun.  Maybe it will work, maybe not.  Eventually my trees will get large enough to shade the path for at least part of the day, but even then some areas might be too sunny.  I'll keep evaluating and see if I need to think of something else. 


Here is an area that has filled in well.  A friend warned me that the moss in her yard grows all over her flagstones and has to be cut back periodically.  I was hoping to avoid that, but it seems that all groundcovers tend to take over flagstones eventually.  I feel better about the moss than the mint, though.  I still have peppermint and spearmint in my garden, but they are safely enclosed in pots.  No more runaway mint nightmares for me!

November 5, 2013

Snowy Shots From The Garden


We woke up to snow this morning, much to the excitement of the children.  I immediately thought of the hundreds of bulbs still waiting for me to plant.  Hopefully the snow will be gone by Friday, when my husband generously offered to help me get them into the ground.


You can see the roses still have leaves and mounds of catmint still need to be cut back.  I need more fall weather before winter arrives to stay.


Here is the view from just inside the back gate.  We have been enjoying watching the cute little birds that flock to the crabapple trees to eat the fruit.


The contorted filbert is lovely with branches stripped almost clean of leaves and catkins dangling like Christmas ornaments.  It actually produced a couple of nuts this year.


A clump of Siberian iris in front of 'Green Mountain' boxwoods forms an interesting contrast of textures. 


For now there is plenty of texture in the garden, though soon the last of the deciduous leaves will fall from shrubs and perennials will collapse into piles of mush.


The dwarf Arctic willow still has leaves, pretty fluffy thing.  I'll cut it back to the ground in spring to keep it from getting too large.


This is the main sunny garden.  I'm still scratching my head about what changes to make next spring, because it's not quite right yet.  Maybe I can fit a few more English roses here, but do I really need more roses? 


Straw-colored hydrangea clusters hold mounds of snow.  Just looking at that chilly metal bench makes me shiver.


Maybe by next winter the swing set will be mostly camouflaged by quick growing 'Hall's Purple' honeysuckle.  The leaves did turn deep purple last month, which made a Halloweeny scene with the deep maroon leaves of the 'Shasta' doublefile viburnum in the corner. 


The jagged boulders look interesting in the snow.  The little shrub on the bottom right is the Koreanspice viburnum that had such great fall color.


I can't count the number of time my toddler tipped this fountain over in the past year.  Maybe by next summer he'll have outgrown that urge.


Here is a final view looking east, with one of my favorite 'Green Tower' boxwoods taking center stage.  Glancing out the window, I see that the snow has melted from the street and from the edges of the garden beds.  Phew.  There is hope for bulb planting later this week.