

This month I bought 'Fine Art Wedding Photography' by top photographer Jose Villa (available from Amazon here) and have enjoyed studying his methods and thinking of ways to apply them to my garden photography. Here are five of his tips that can apply, along with my attempts to illustrate his points with photos of the spring bulbs in my garden. Included are 'Tete-a-Tete' mini daffodils, 'Spring Beauty' scilla and 'Grande Maitre' crocus. Of course my photos are nowhere near as beautiful as his, which you can see on his blog here.
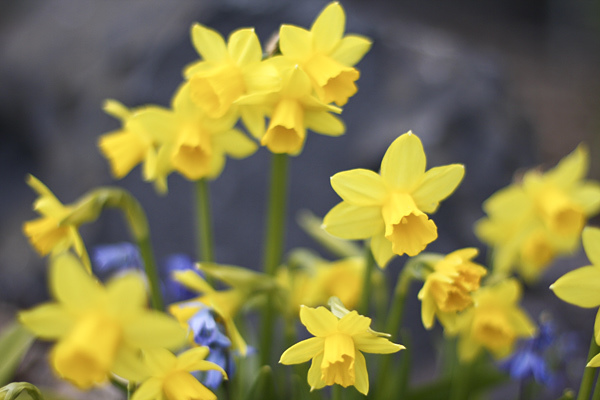
1. Photograph with your aperture wide open (ie with a low f-stop). In layman's terms, this creates a blurry background. It requires leaving full auto mode and going at least to Av mode, if not full manual. Unlike Mr. Villa, I am not quick enough with manual to use it much, so I set my camera to Av mode so I can push the f-stop all the way down to 2.8 or 1.4, depending on which lens I'm using, and let the camera figure out the rest of the settings. A bonus to using a low f-stop is that it reduces the blurriness from camera shake, which is especially helpful in dimmer light. You can see in the photo above that not all of the daffodils are on focus thanks to an f-stop of 2.0.

2. Take advantage of the soft skylight that lasts about 10 minutes after sunset (or before sunrise). Mr. Villa goes so far as to check sunset times on days when he's shooting a wedding so he can make sure to have the newlyweds available for photos during this time. Well, most photographers already know that the best light is right around sunrise or sunset. A cloudy day can produce similar light. The nice thing about this type of light is that there aren't many shadows, so you can shoot in any direction. This light also lets you capture good colors instead of the washed-out hues that can occur in strong sunlight.
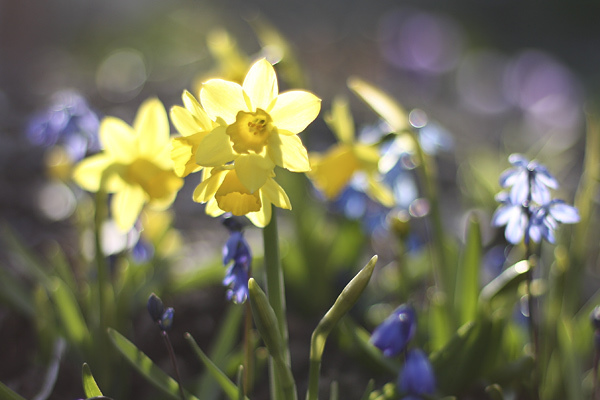
3. Backlight your subject when shooting in strong sunlight. When I first started taking pictures for this blog, my instinct was to do exactly the opposite, and shoot with the sun at my back. But backlighting (shooting with the sun behind your subject) creates especially pretty pictures when the light is low just before sunset, with the flowers glowing. The photo above shows the same clump of daffodils and scilla as the photo above it, only one is backlit with the setting sun and the other is lit with soft skylight. The backlit flowers are very striking, though perhaps you can see true colors and detail better with the softer lighting.

4. Expose for the shadows. This applies to backlit subjects. To do this (sorry for the non-technical terms here), make sure that the center red dot on your screen flashes/beeps right on the point (often the center of a flower) where you want the best focus and correct exposure. This will cause you to lose some detail in the 'blown out' highlights of the background (which will be blurry anyway since you're shooting with a low f-stop), but will keep your focal point clear and properly exposed. This makes the overall photo brighter, with soft colors and glowing light. In the photo above, you can see white splotches in the background that have no detail thanks to the low f-stop and overexposure, but they don't detract from the flowers in the focal point, and the whole photo is filled with light.
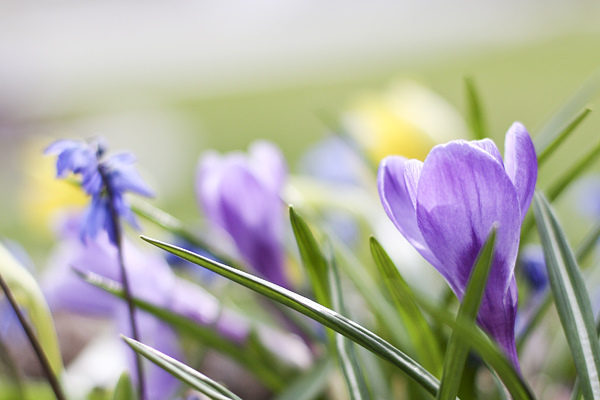
5. Overexpose for soft colors and glowing light. I have a hard time giving up vivid colors to create this effect, but I tried for this post. You can see that the photo above is slightly brighter and the colors softer than the one below. Mr. Villa overexposes by adjusting his manual ISO setting to one f-stop below the speed of the film (so he sets 3200-speed film at 1600-speed). Since I'm not that proficient in manual and I don't use film, I adjusted the exposure on my computer by using Photoshop Elements' RAW editor.

Of course most of us aren't going to be able to create photographs as beautiful as Jose Villa's, but experimenting with his methods could help us capture some shots that are better than expected. I'm certainly having fun with his tips, and can't wait to try them out while photographing my children, too. If you try any of these tips and have success, be sure to leave a comment and post a link to your photo(s). Best wishes!
They are AMAZING photos! You are a great photographer and have a great eye for colour and form.
ReplyDeleteI recently took wedding photos for a girlfirend and just used auto on a fancy camera and left the effects to photoshop! I'd love to learn how to use a camera properly though...
Beautiful! I must slow down long enough to learn how to use my camera properly.
ReplyDeleteEvery time you do a post on taking pictures I am awed. Your pictures are incredible. So soft and beautiful!
ReplyDeleteInteresting and fun. I've found that I can do quite a bit of photo editing with MS photo editor. Your photos are fabulous.
ReplyDeleteHi VW,
ReplyDeleteBeautiful photos and I love Jose's photos too. When, or if I get married I'm going to look for a contemporary wedding photographer, so many think just because they have a 'fancy' camera they're automatically a photographer and their photos are so boring and pedestrian... grrrr.
Anyway, I'll be having a go at some of the techniques... Well, most I use anyway but definitely the exposure tip, I just love the crisp white of Jose's photos.
I love the techniques that you used in these pictures. I'm going to try working with the aperture again, I've tried before but didn't get results like yours. Thanks for some great tips!
ReplyDeleteGreat tips! I admit to being a wimp and relying almost exclusively on manual, but you're tips seem a bit more 'doable' than the advice I'm often given, so I think it's time for me to experiment a bit more.
ReplyDeleteI need to explore my camera better, I should know how to do more than the basics. I like your low ap pictures, but especially like the backlighting one. I will reread this posting with camera and 'how to' book in hand!!
ReplyDeleteYes, yes, take some time to try Av setting instead of full-auto! That is the first experiment I'd recommend. I remember how exciting it was when I discovered how to make the background blurry and all the sudden my photos looked more artsy. Not every lens/camera goes down to a low f-stop, though. Many of my friends have Nikon cameras that come with f/3.5 lenses, which will get the background at least kind of blurry. My Canon Rebel XS kit lens only went down to 5.6, bleh. Lenses get more expensive as the f-stop gets lower, BUT I've heard good things about the Canon 50mm f/1.8 for $125 from Amazon or B&H Photo(Canon also makes a 50mm f/1.4 at $400, which I have, and the uber-expensive 50mm f/1.2 for $1,700). This little 50mm f/1.8 would be A LOT of fun for someone with a Canon dSLR who wants a better lens with a lower f-stop but doesn't have a big budget. It's not built as sturdily as their professional-quality lenses, but if you don't drop it down a cliff or use it in rainstorms it would hold up fine.
ReplyDeleteAnd Liz, your style of photography definitely reminds me of Jose Villa's - lots of clean white light and soft backgrounds. You make beautiful pictures. I'm sure you'll find someone great for wedding photos someday.
ReplyDeleteGreat tips and you have encouraged me to play a bit when snapping pics.... Thanks!
ReplyDeleteThanks for all the great tips. I think the photos you got using them for this post are wonderful. I've tagged this post so that I can come back to it easily. -Jean
ReplyDeleteDear dear dear VW, I am really excited about this generous post sharing your photographic journey. Your photos are fabulous. I am beginning to understand (I'm rather slow in learning all this stuff) and in my last post took all the photos using manual and editing them on google's piknic. My teacher recommended using as low an ISO as possible, 100 or 200 max to avoid a grainy look. He also recommended Lightroom for editing the photos digitally. Do you know about this?
ReplyDeletecheers, catmint
Hi Catmint,
ReplyDeleteWhat I've heard of Lightroom is that it's great for doing all-over edits of photos, but it doesn't have selection tools to edit just one part of the photo at a time (I might be mistaken, though). For my blog photos, I mostly do all-over edits, but sometimes on portraits I sharpen just the eyes and leave the rest softer - not sure if you can do that in lightroom. Also not sure if you can run Actions in lightroom, which are very fun for portraits. Lightroom is supposed to be the best program for organizing/storing photos. My friend's husband, who is becoming quite a wedding photographer, uses only Lightroom to edit. I'll probably stick with Photoshop Elements for now since it's what I know and works well for me. I think PS Elements is also less expensive. I'm not as concerned about organizing my photos as perhaps I should be.
Your photos are just lovely. Well done!
ReplyDelete